 3D character
Guide · 8 min read
Face topology for animation
Face topology is the layout of edges on a character’s face, and it decides how every blink, smile and spoken word deforms: edges follow the eyes and mouth, poles sit where the face barely moves, and the triangle budget leaves room for both.
Why topology decides the expression
An expression on a game character is the same set of vertices, moved. A blendshape for a smile stores a new position for every vertex of the face; a facial bone moves the vertices weighted to it. Neither one adds geometry. If no edge runs where the smile crease should form, the crease cannot form. If the edges cut across the direction of a movement, the surface stretches, pinches or flattens instead of folding.
That is why topology is planned before the facial system, and why a beautiful sculpt does not rescue a poor game mesh. The sculpt’s detail is baked into textures. The expressions are carried only by the game mesh’s edges.
It also explains the order of work. Shape keys are stored per vertex. Blender’s manual describes them as a way to deform an object into new shapes; the vertices stay the same, and only their positions change. Change the face’s topology after the shapes exist, and every shape has to be checked, transferred or rebuilt.
Edge flow around the eyes
The eye area needs edges that ring the opening and spread out toward the brow, the temple and the cheek. They let the lids close in a round arc, and let a squint gather the skin around the eye instead of dragging it.
- Matching lids. The upper and lower lid edges should line up vertex for vertex, so the lids meet cleanly when the eye closes.
- A rim with thickness. One or two tight rows at the lid edge hold its thickness as it slides over the eyeball.
- Smooth rims. Reallusion’s face topology guide asks for eyelid edges that are vertically smooth, because the rim defines the eye shape in every expression.
- Room for the brow and cheek. The flow should continue up into the brow and down into the cheek, so
browDownLeftandcheekSquintLeftmove the right skin.
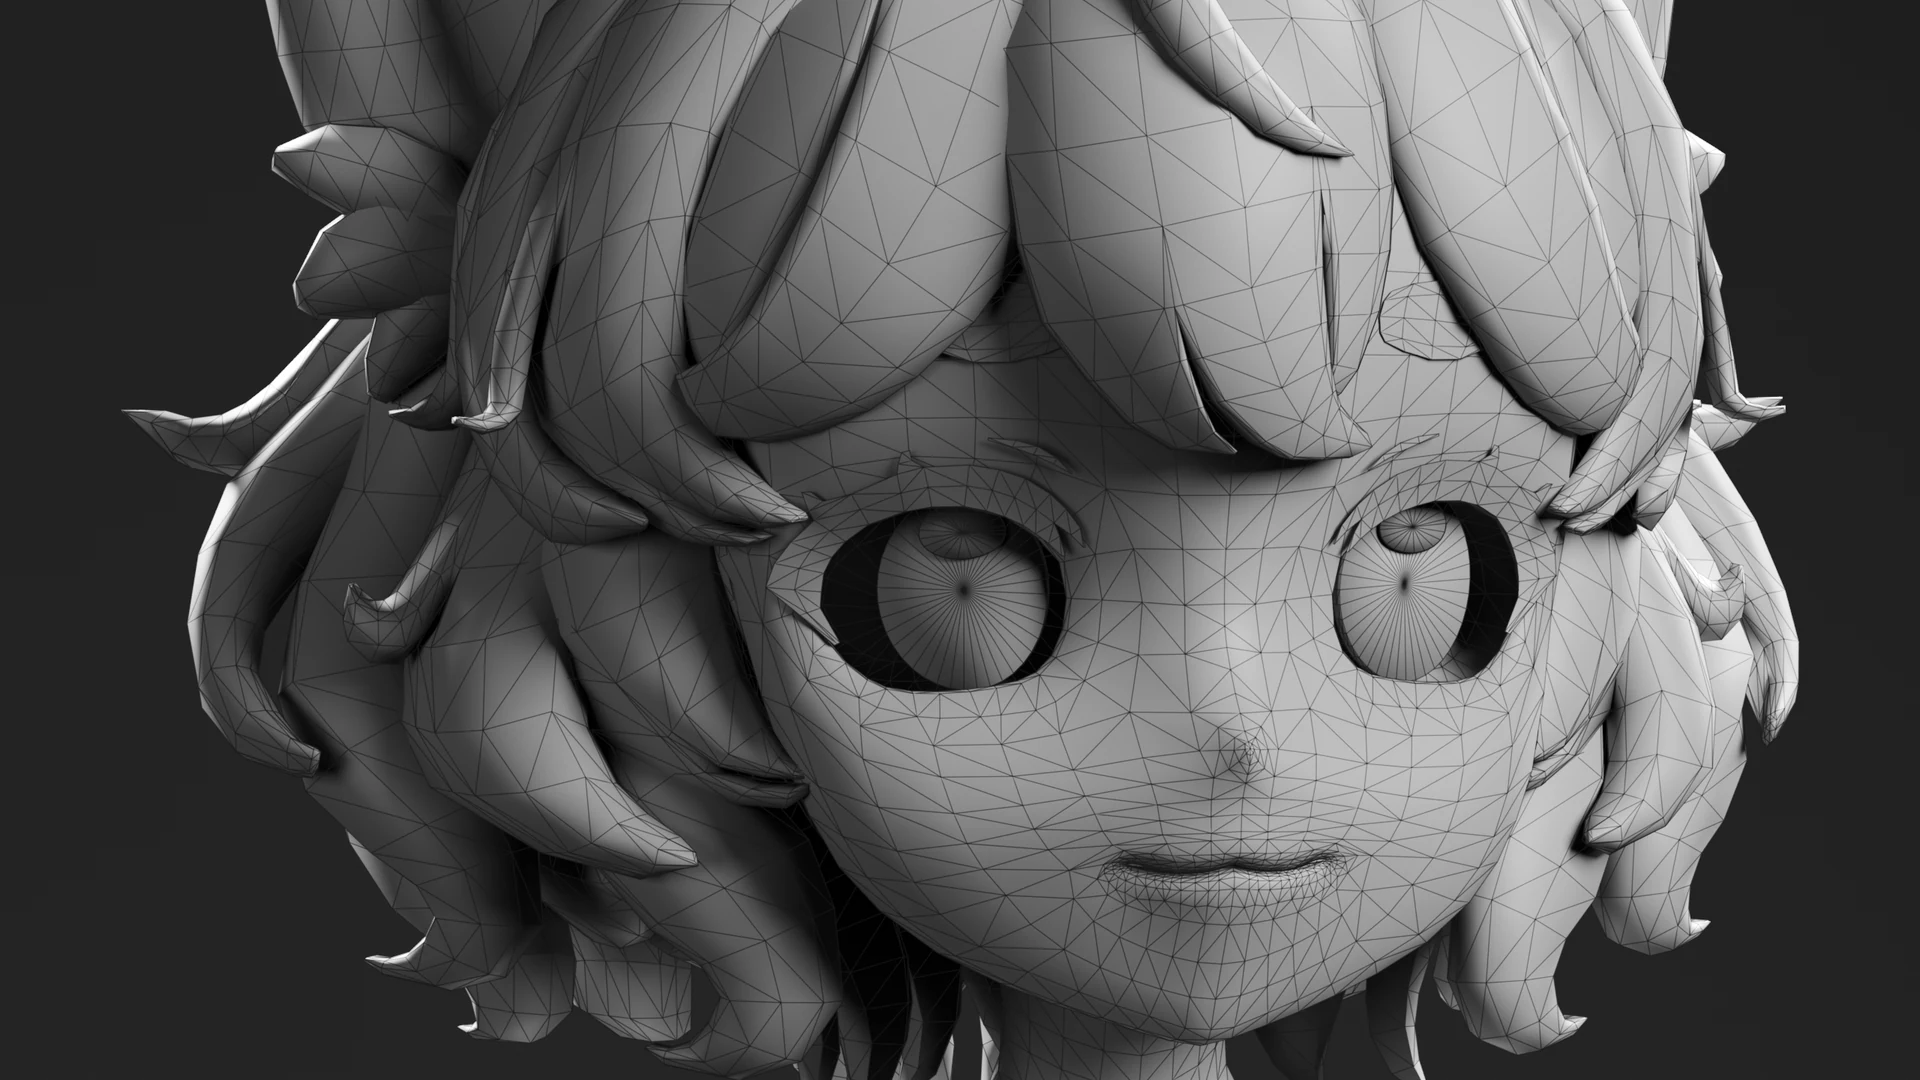
Stylized and anime eyes add a twist: the outline of the eye is often part of the expression itself, as with a closed, smiling eye or a wide, shocked one. The edges have to support those outlines, not only a realistic blink.
Edge flow around the mouth
The mouth drives 23 of the 52 ARKit blendshapes, plus every viseme. It needs the most careful edges on the face.
- Rings around the lips, following the muscle that circles the mouth. They let the mouth stretch wide for a smile and gather for a pucker or an “oo”.
- Even spacing. Reallusion’s guide asks for an even distribution of the mesh around the lips, so the upper and lower lips stay together when the mouth closes.
- Density at the corners. The corners travel furthest: out for a stretch, up for a smile, down for a frown. They need enough edges to bend without folding over.
- An inner lip. The flow continues inside the mouth, so an open mouth shows lip thickness and a modeled inner mouth instead of a hole.
If the character will use tongueOut or show teeth when talking, the teeth, tongue and inner mouth belong in the topology plan too.
The cheeks and the nasolabial fold
When a face smiles, the cheeks rise and a fold appears from the side of the nose to the corner of the mouth. Reallusion’s guide asks for a fold that flows naturally from the wings of the nose to the mouth corners. On the mesh, that means a line of edges along the fold, connecting the flow around the nose to the flow around the mouth.
The cheek is also where the eye and mouth systems meet. cheekSquintLeft lifts the skin under the eye while mouthSmileLeft pulls the corner of the mouth up and back. If the edges between them are tangled, the two shapes fight when they combine, and a genuine smile usually brings the squint with it.
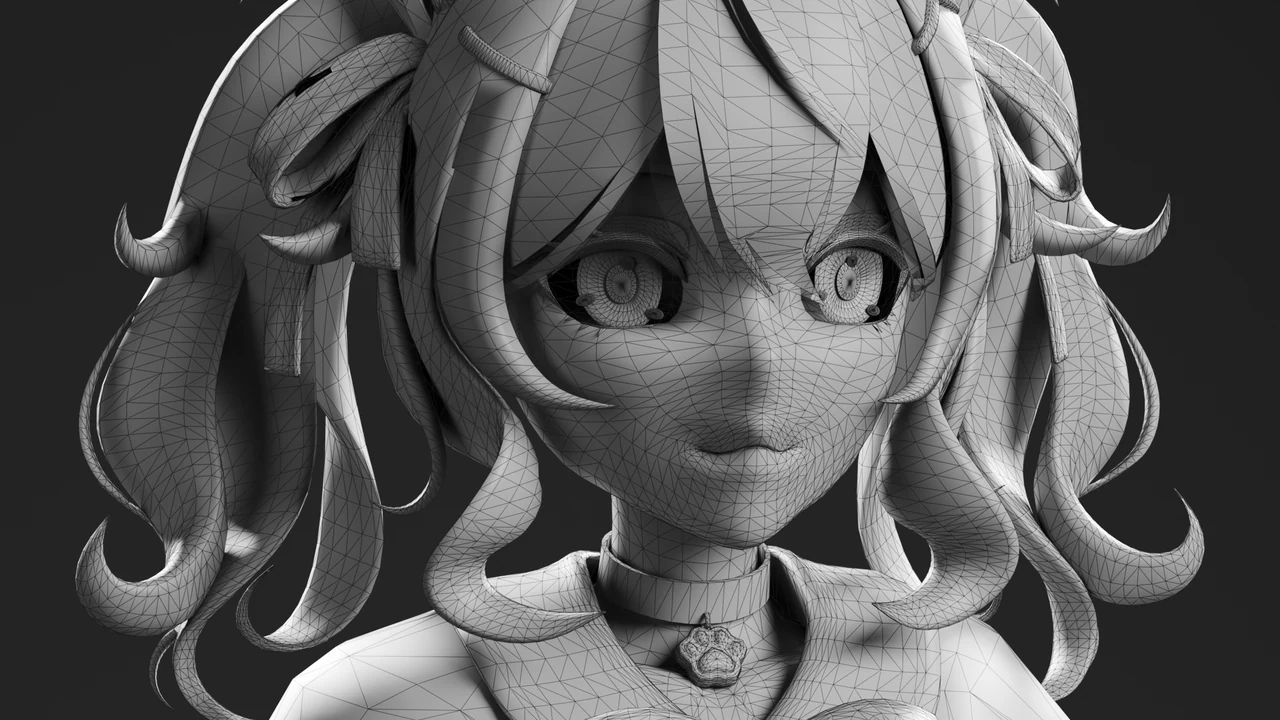
Stylized faces often drop the visible fold, as NumiNumi’s and LueLue’s do. The edges still have to let the cheek rise without bending the mouth out of shape.
Poles: where the flow turns
In a clean quad mesh, most vertices connect four edges. A pole is a vertex that connects three, or five and more. Poles are unavoidable: they are how edge flow changes direction, for example where the rings around an eye meet the rings around the mouth.
The rule is placement. Put poles where the face moves least: the forehead, the side of the nose, the flat of the cheek, the jaw line. Keep them off the lid rims, the lip corners and the fold. A pole in a deforming area shades unevenly and creases in odd directions when the skin stretches.
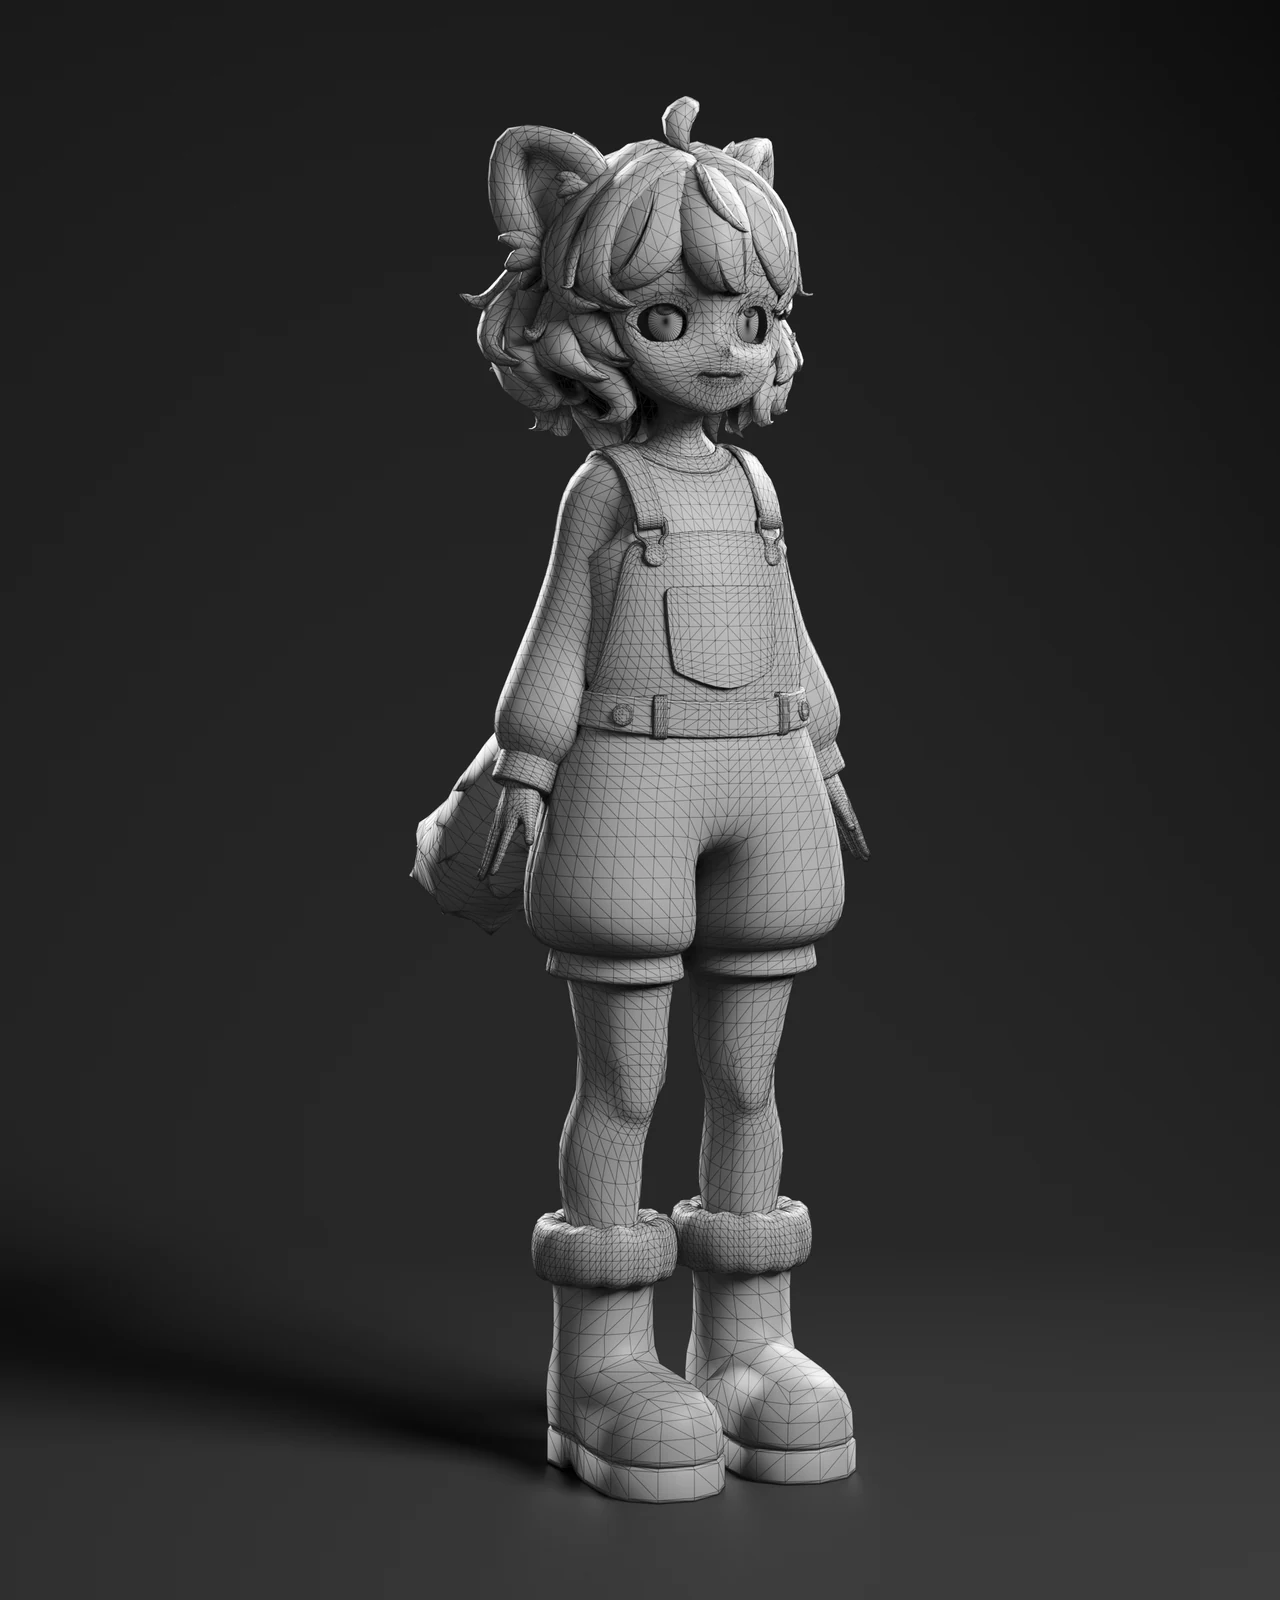
Not every pole is a problem. The fan of triangles at the center of each iris in the first image of this guide is a pole with many edges, on a small, nearly flat disc. The poles to worry about are the ones in skin that stretches.
Quads, triangles and the game mesh
Graphics cards draw triangles. Every quad becomes two triangles by the time the mesh is in the engine, which is why the delivered meshes in this guide look triangulated.
Whether the artist works in quads or shapes the triangles directly, the flow still has to be readable: strips of edges that follow the eyes, the mouth and the fold. Quads make that flow easier to see and edit, and a quad splits into two triangles in a predictable way. Triangles placed on purpose are fine in flat areas that never bend. In the lids, the lips and the fold, a stray triangle that breaks the flow shows up as a kink in the expression.
Fix the triangulation once, before baking, so the baker and the engine agree on the same diagonals. Our guide to how a 3D game character is made shows where that step sits.
How many triangles the face needs
There is no fixed share. The face is small, but it deforms more than any other part of the body and the camera often sees it in close-up, so it usually earns more density per square centimeter than the torso or the legs. How much depends on the camera and the facial scope: a character seen from a distance with a few expressions needs far less than one built for face tracking.
The full-body budget sets the ceiling. Inside it, density goes first to the eyes, the mouth and the joints, then to the silhouette, and last to surfaces that never bend. Here is how three of our characters compare:
| Character | Triangles | Facial system |
|---|---|---|
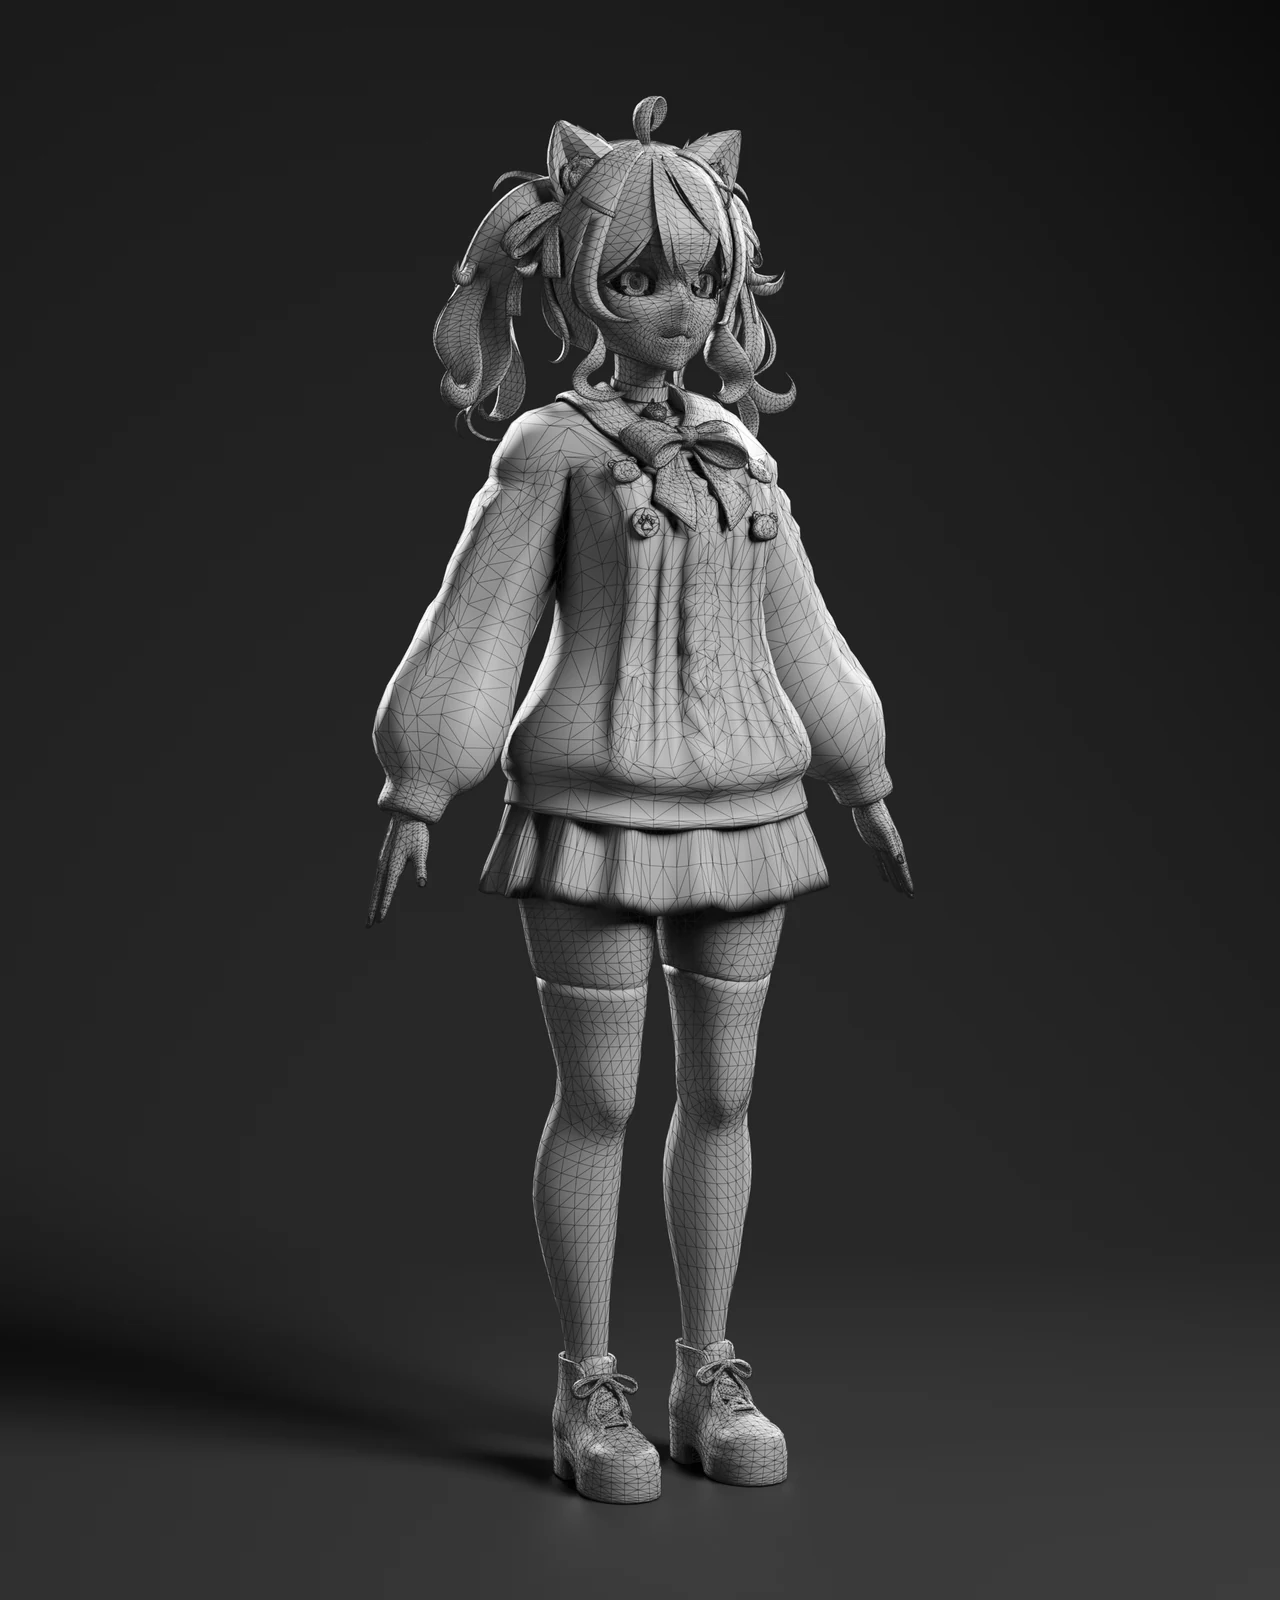
| LueLue | 69,637 | 99 working shape keys: ARKit 52, 15 visemes, 18 expressions, 14 toggles and controls |
| Rocco | 66,648 | 111 shape keys, face and outfit toggles |
| Brutus | 40,393 | 104 shape keys |
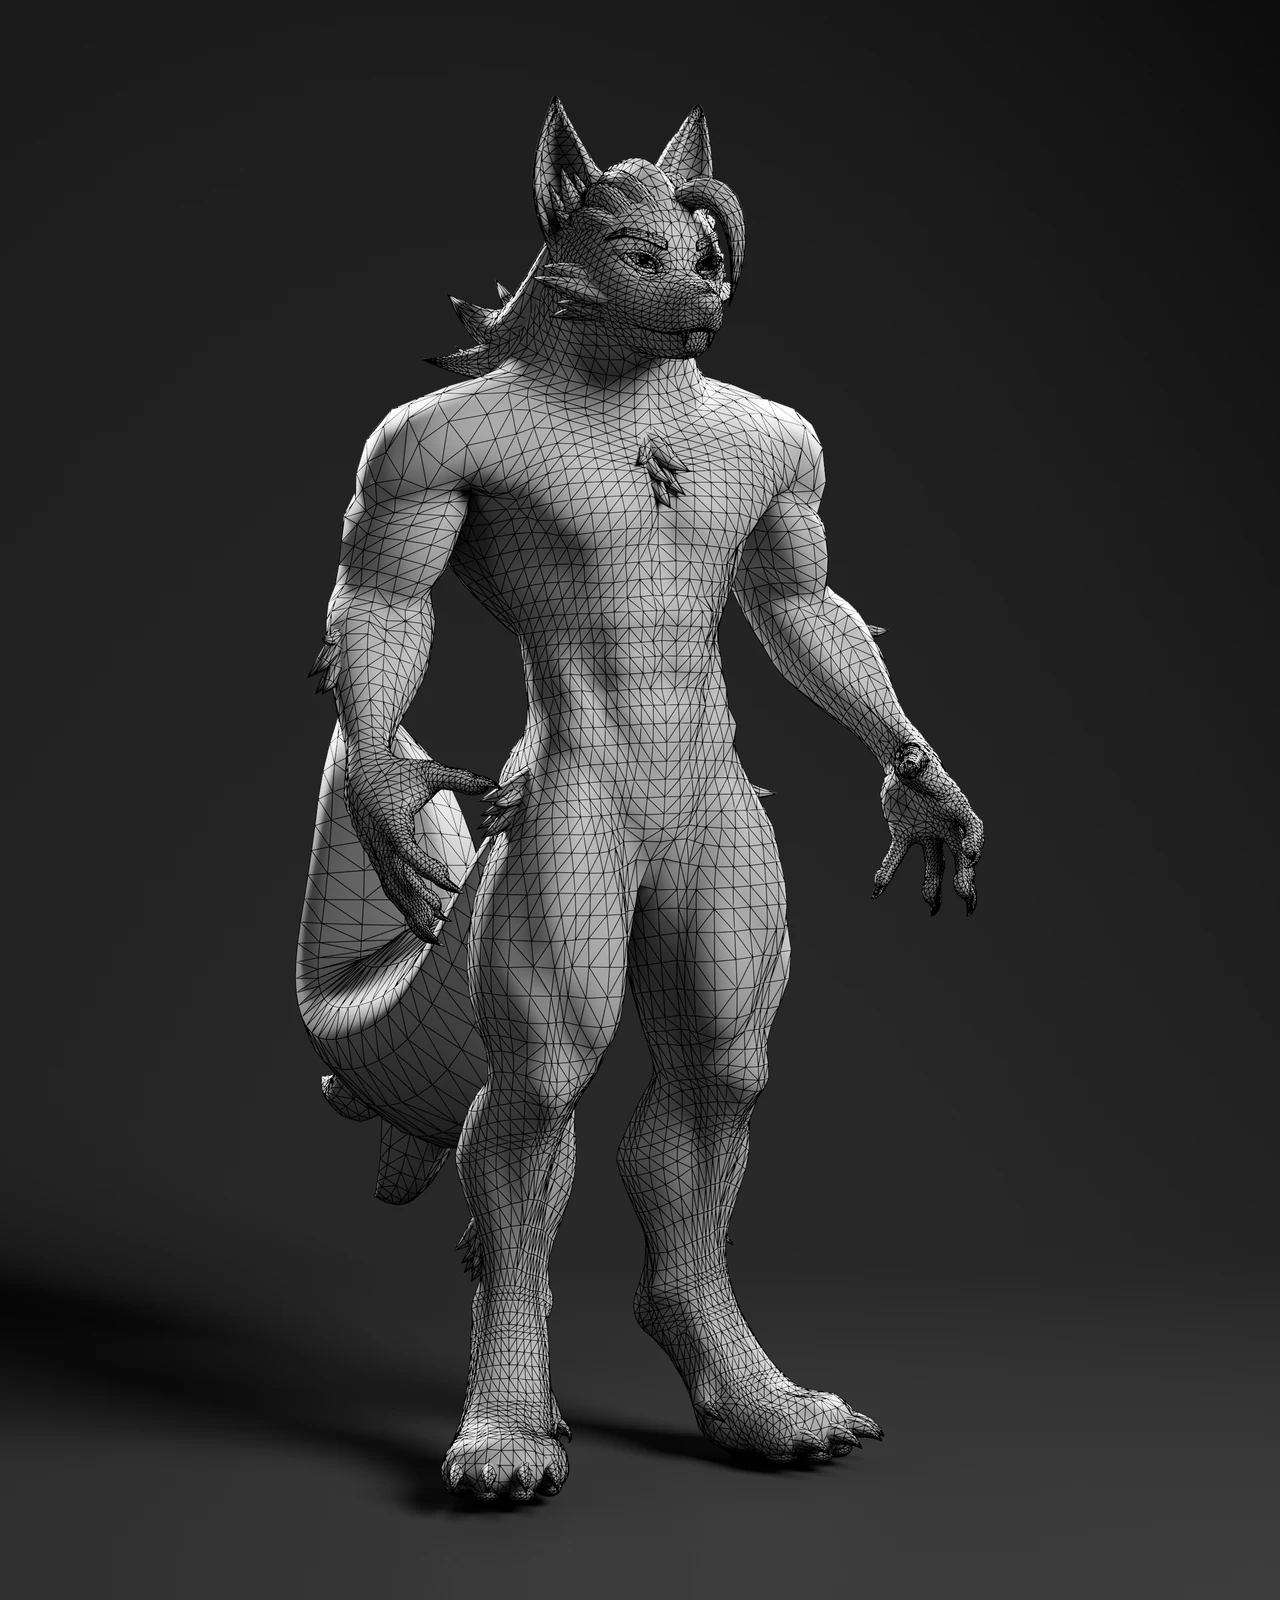
Brutus is the useful outlier: 104 shape keys on 40,393 triangles, the lightest mesh of the three. A wide facial range does not demand a heavy mesh. It demands edges in the right places.
Check the vertex count in the engine as well. Unity’s documentation on mesh index formats notes that meshes use a 16-bit index buffer by default, which supports up to 65,535 vertices per mesh. UV seams and hard edges split vertices on import, so the engine’s count is higher than the modeling tool’s.
Three delivered meshes
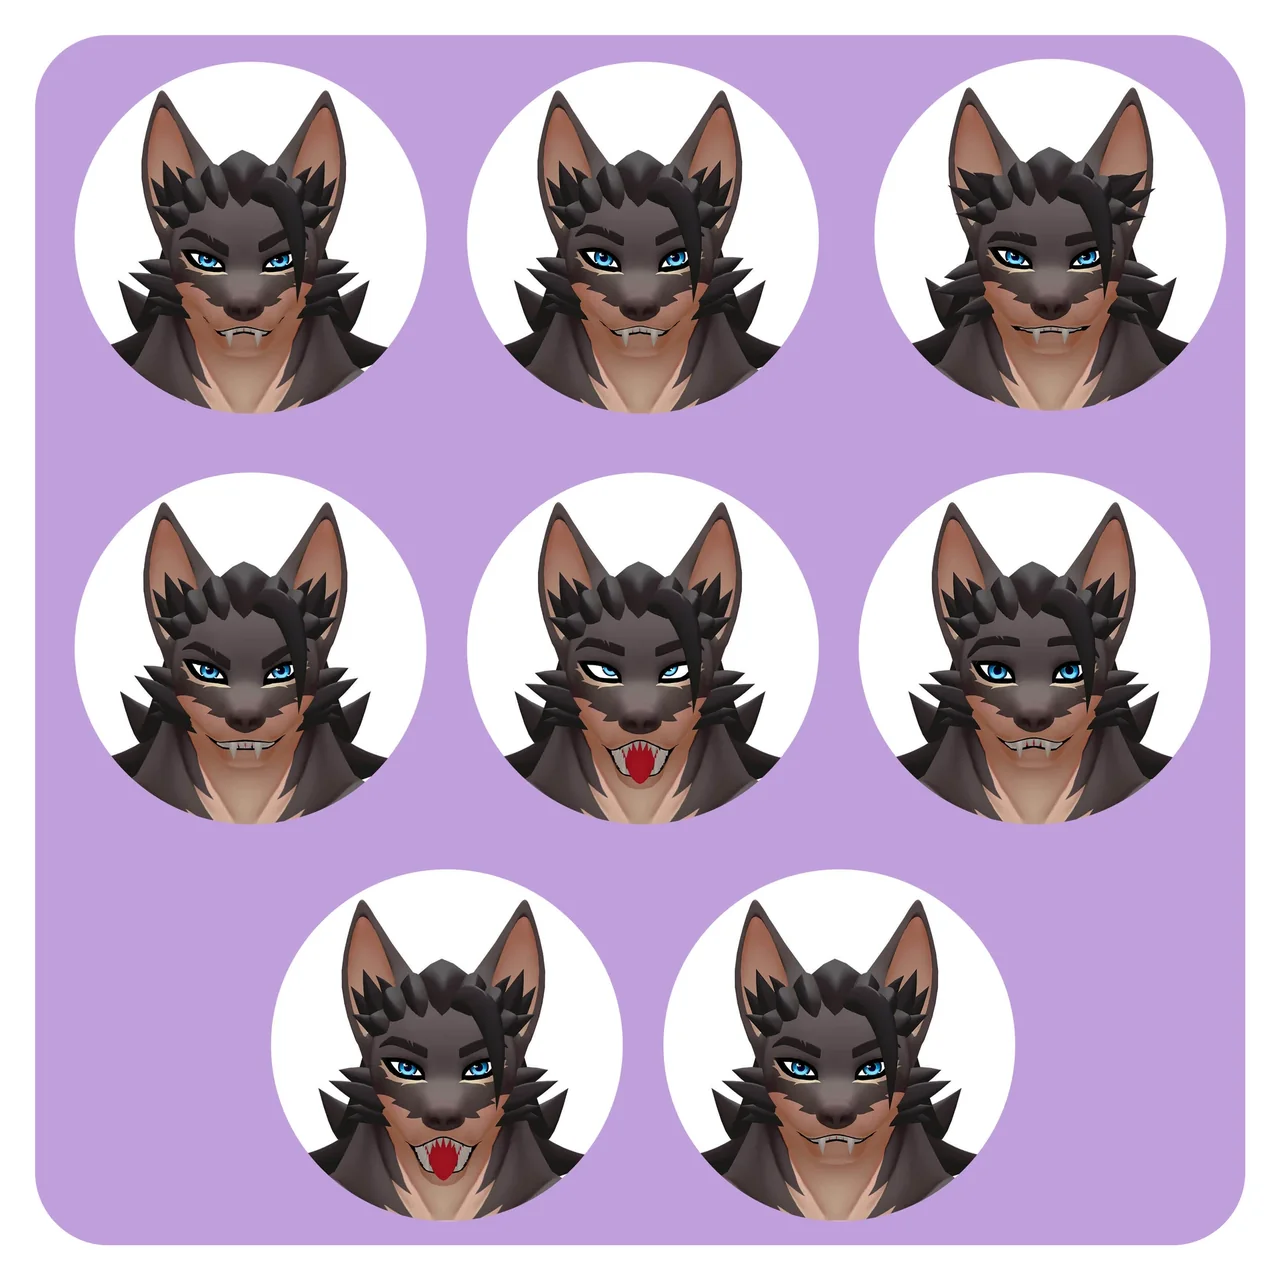
These are full-body wireframe renders of three delivered, triangulated meshes. Each line is an edge of the game mesh. On a face built for expression, the edges should gather around the eyes and the mouth, as the two close-up face renders in this guide show.
Deformation problems and their causes
Most facial problems you can see in a review trace back to a specific gap in the topology. Naming the cause makes the feedback faster to act on:
| What you see | Usual cause in the mesh |
|---|---|
| The lids leave a gap, or cross, in a full blink | Upper and lower lid edges that do not match, or too few edges on the rim |
| The mouth corner pinches or folds in a wide smile | Too few edges at the corner, or a pole sitting on it |
| The lips turn thin and sharp when the mouth opens | No inner-lip edges to carry the thickness |
| The cheek stays flat in a smile | No edges along the fold for the cheek to rise against |
| A dent or a dark patch appears during an expression | A pole or a stray triangle in skin that stretches |
| Faint seams show on the face under moving light | The bake and the engine split the quads along different diagonals |
The first four are fixed by adding or rerouting edges, which is cheap before the facial system exists and expensive after it. That is the argument for reviewing the wireframe at the retopology stage, not at handoff.
How to review a face mesh
You do not need to be a modeler to review a face. Ask for the right views and check these points:
- A wireframe of the face, front and three-quarter, at full resolution.
- Edges that ring each eye and the mouth, and a line along the fold if the style has one.
- No poles on the lid rims, the lip corners or the fold.
- Upper and lower lids with matching vertices.
- An inner lip, teeth and tongue, if the mouth will open.
- The extremes tested before shapes are approved: jaw fully open, a wide smile, a full blink, a pucker. Look for pinching and collapsing volume.
- Triangle and vertex counts read in the engine, against the budget.
Our 3D character modeling service plans topology for deformation from the blockout, and rigging and facial systems builds the shapes on top of it. For the shapes themselves, read ARKit 52 blendshapes explained.
Sources
Sources: Reallusion, CC face topology guide, Unity scripting reference, Mesh.indexFormat, Blender manual, shape keys, Apple, ARFaceAnchor.BlendShapeLocation.
