 3D character
Guide · 9 min read
How a 3D game character is made
A 3D game character moves through ten stages, from concept review to engine setup, and each stage ends with something you can see and approve before the next one starts.
The pipeline at a glance
Studios name the stages a little differently, but the order is the same everywhere, because each stage builds on the one before it. That is also why a change is cheap at the start and expensive at the end. Moving an ear at blockout takes minutes. Moving it after rigging touches the sculpt, the game mesh, the UVs, the textures and the skin weights.
| Stage | Output | You review |
|---|---|---|
| 1. Concept review | Annotated concept, open questions, agreed budgets | Views, callouts and scope |
| 2. Blockout | Rough 3D volumes at game scale | Silhouette and proportions through the game camera |
| 3. Sculpt | High-detail model | The face, the forms and the close-up read |
| 4. Retopology | The game mesh | Triangle count and edge flow at the joints and face |
| 5. UVs | The unwrapped layout | Seams, texel density and mirroring |
| 6. Baking | Normal, occlusion and other mesh maps | Artifacts and seams under moving light |
| 7. Texturing | Color and material maps | The look under game lighting |
| 8. Rigging | Skeleton, weights and controls | Deformation in motion |
| 9. Facial system | Shape keys or facial bones | Each expression, alone and combined |
| 10. Engine setup | The character configured in your engine | In-game look, scale and performance |
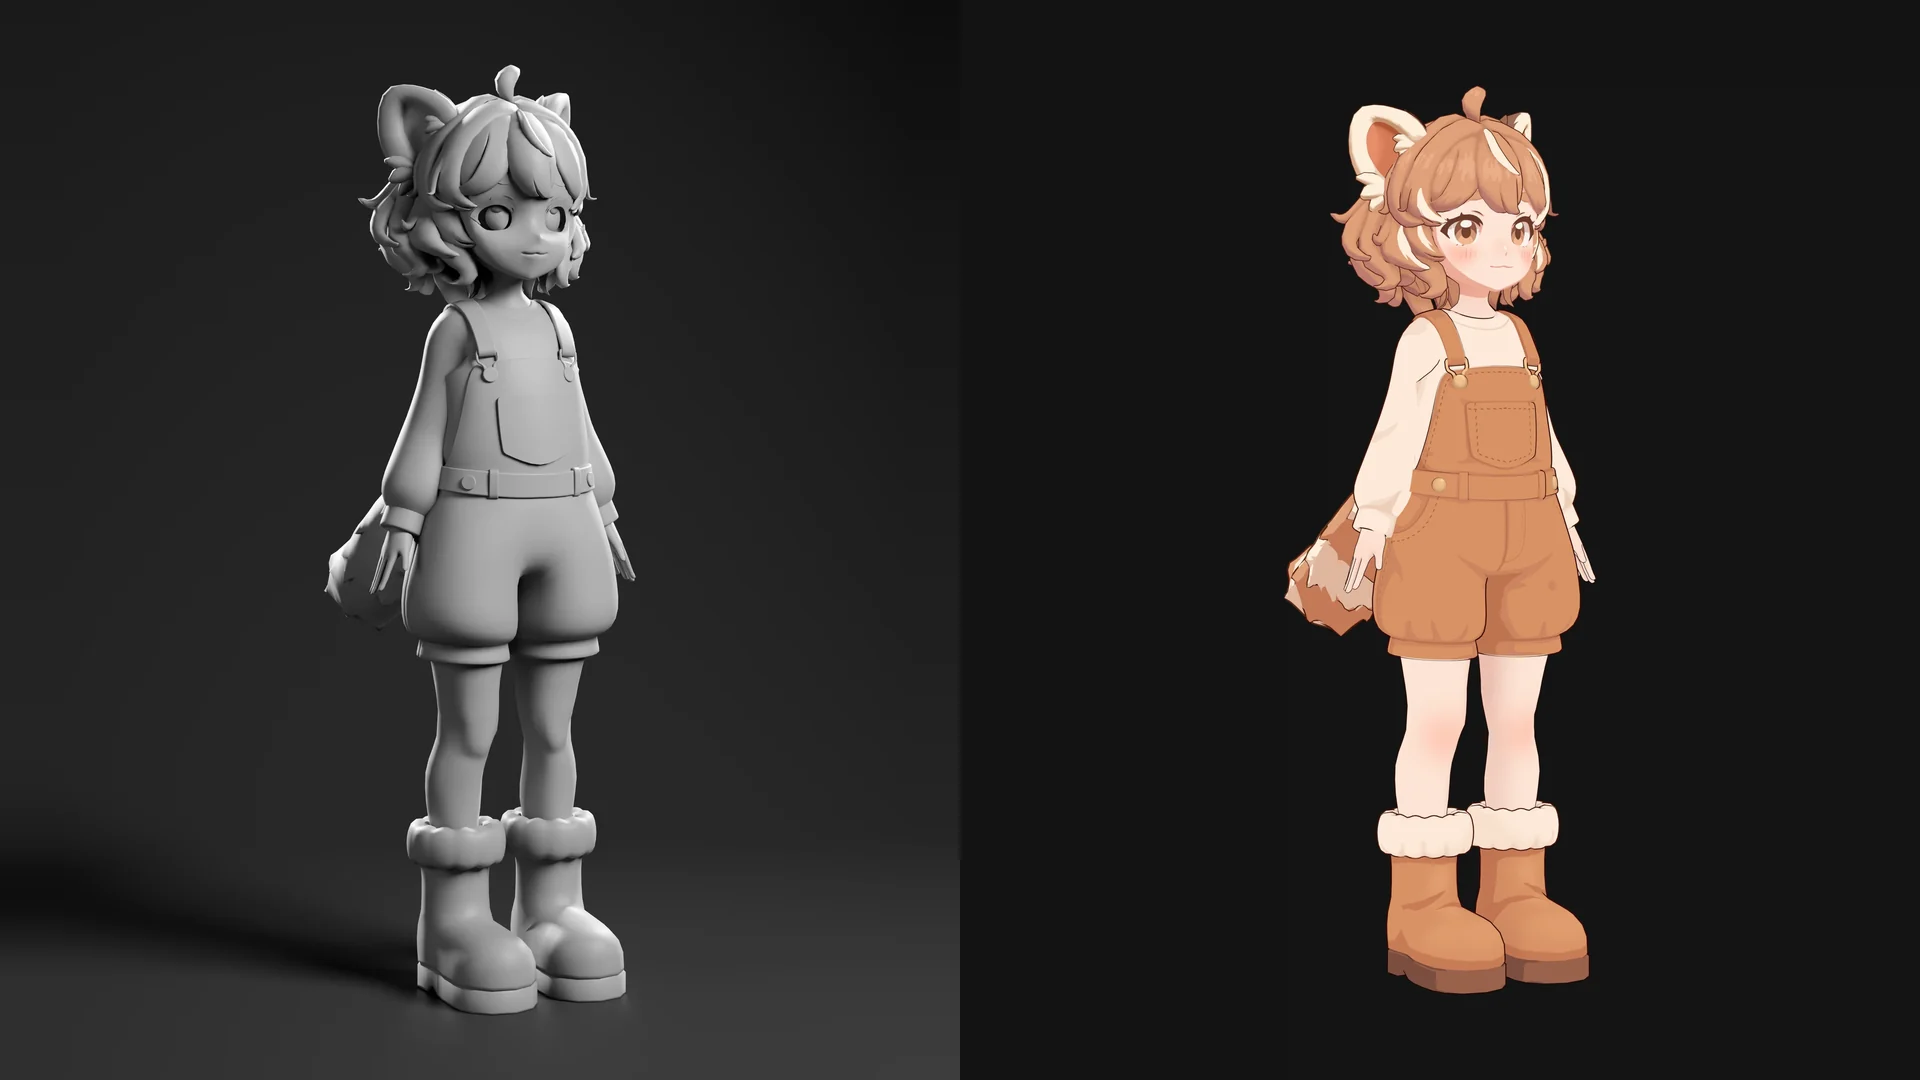
The character we follow below is NumiNumi, a stylized red-panda girl whose PC build has 53,496 triangles and 127 bones. Every image in this guide is one of her own stages.
1. Concept review
Production starts before anyone opens a 3D app. The artist reads the concept the way a builder reads a plan. What does the character look like from the back? How thick is the hair? What is under the jacket? Where does the tail attach? Each open question becomes a note on the concept, or a question for you.
This is also where the numbers get fixed: triangles per platform, texture sets, skeleton, facial scope and deliverables. If they are not in your brief, they are agreed here. Our character art brief template lists every field.
What you review: the views the artist will build from, the callouts on ambiguous areas, and the agreed budgets in writing.
2. Blockout
The blockout is the character in simple volumes: a head, a torso, limbs, the mass of the hair, the main pieces of clothing. There is no detail yet. Its only job is proportion and silhouette, at the scale the character will have in the game.
Review it through the game camera, at gameplay distance, next to the concept. If the head reads too small or the hair merges with the shoulders, fix it now, while a fix means dragging a few vertices. Our guide to shape language in character design covers what to look for.
What you review: silhouette, proportions, and scale against other characters or a reference object.
3. Sculpt
In the sculpt, the volumes turn into anatomy, fabric, hair and a face. A sculpt can carry millions of polygons, because it never goes into the game. Its detail is transferred to the game mesh later, at the baking stage.
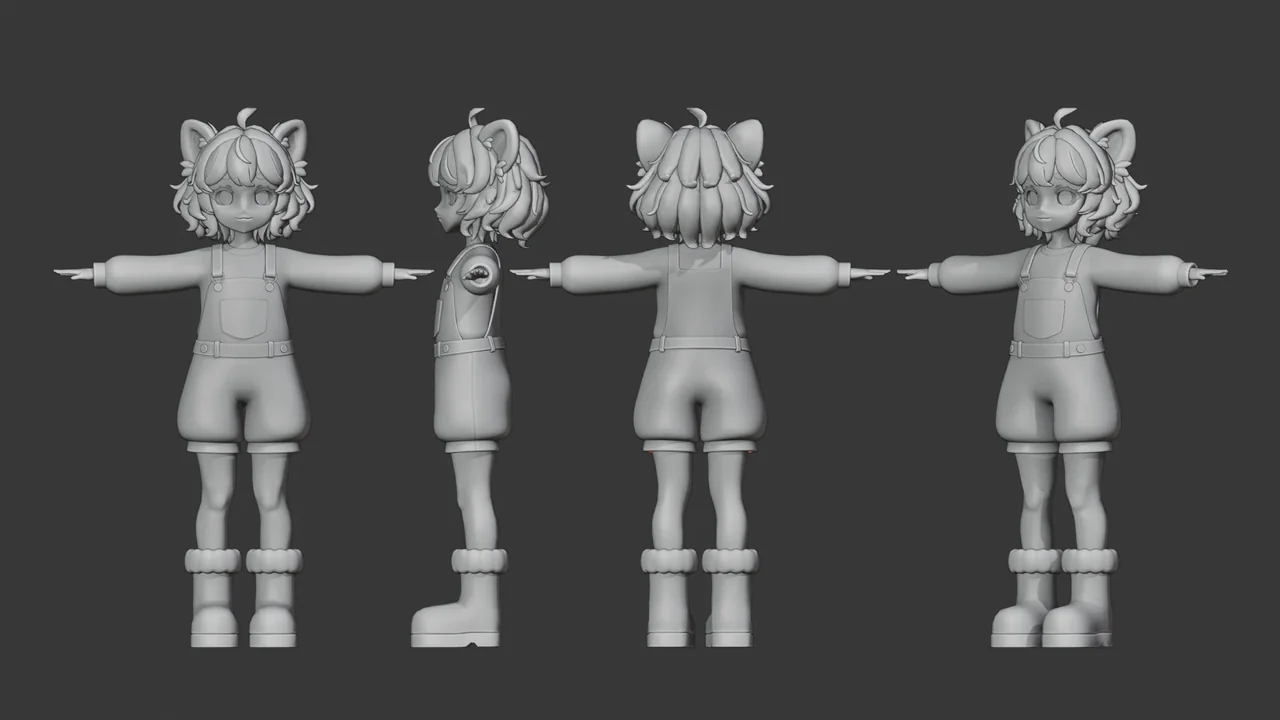
Review the model in clay, without color, so the forms have to work by themselves. Look closely at the face: the eye shape, the corners of the mouth, the planes of the cheeks. Approve the sculpt before retopology starts, because every change after this point has to be made twice, once on the sculpt and once on the game mesh.
What you review: the face, the main forms and folds, and the read in close-up.
4. Retopology
Retopology builds the game mesh: a new, lighter surface laid over the sculpt, with every edge placed on purpose. Two things drive it. The triangle budget sets how many polygons there are. Deformation sets where they go: edge flow around the eyes and mouth, extra edges at the shoulders, elbows, wrists, hips and knees, and fewer edges on surfaces that never bend.
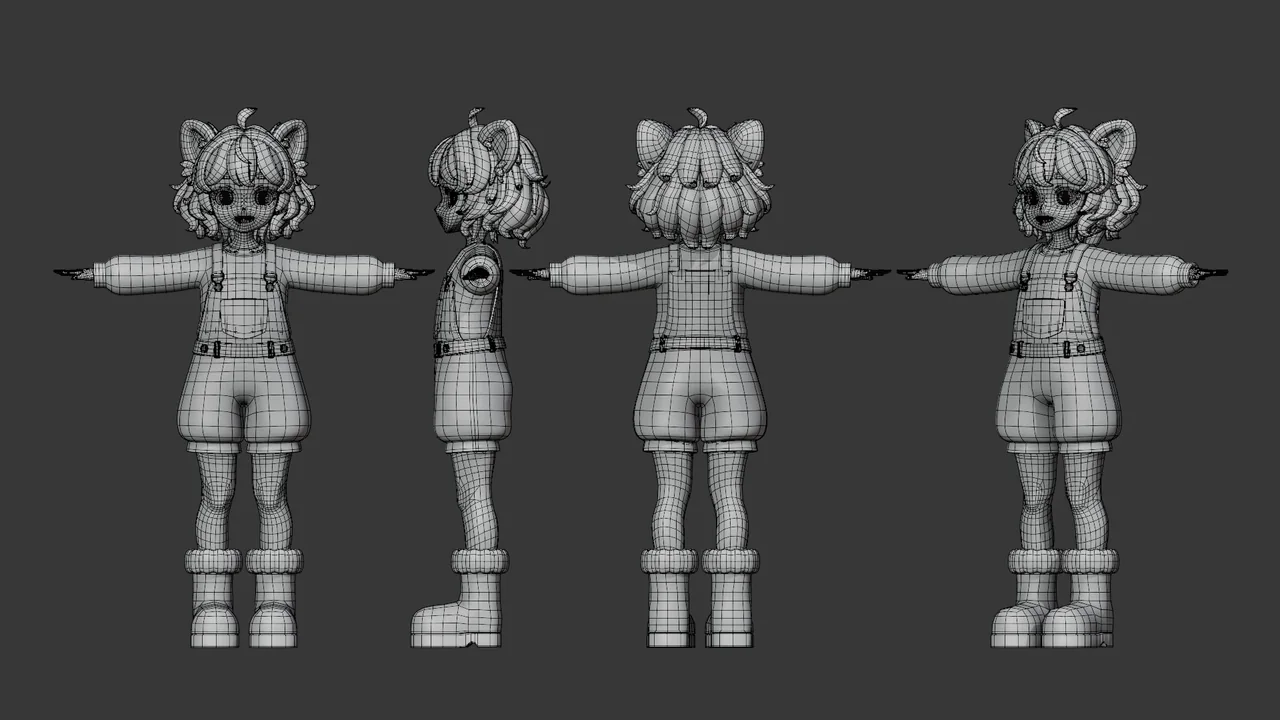
Review the wireframe, not only the shaded model. Check the triangle count against the budget for each build, and look at how the edges run around the face. Our guide to face topology for animation explains what good edge flow looks like.
What you review: the triangle count per build, the edge flow around the face and joints, and clean areas where the mesh will deform.
5. UVs
UVs unfold the 3D surface flat, so a 2D texture can wrap around it. The layout decides how sharp the texture looks and where the seams fall. Good UVs keep texel density even, meaning the same texture resolution across the body, or more on the face by choice. They hide seams under hair and inside folds, and they mirror symmetrical parts only where the texture can be symmetrical too.
Mirroring saves texture space but makes both sides identical, so a scar, a logo or asymmetrical makeup needs its own space. Decide which details are one-sided before the layout is approved.
What you review: a checker pattern on the model. The squares should be even in size and straight across the face; stretched or tiny squares show where texture detail will blur.
6. Baking
Baking transfers the sculpt’s detail onto the game mesh as textures. A normal map makes the low-polygon surface catch light as if the sculpted wrinkles and seams were still there. Ambient occlusion, curvature and thickness maps feed the texturing stage. Adobe’s documentation shows how Substance 3D Painter bakes these mesh maps and which settings control them.
One technical rule saves trouble later: bake against the same triangulation the engine will use. If the engine splits the quads differently from the baker, normal maps show faint seams and dents that no texture artist can paint away.
What you review: the baked maps on the game mesh, under a moving light. Look for seams, waviness and details that seem to float off the surface.
7. Texturing
Texturing paints color and material: skin, fur, fabric, metal, and the small marks that make a character look lived in. It follows the art direction, whether that is a stylized painted look, physically based (PBR) materials, or a stylized look built on a PBR workflow.
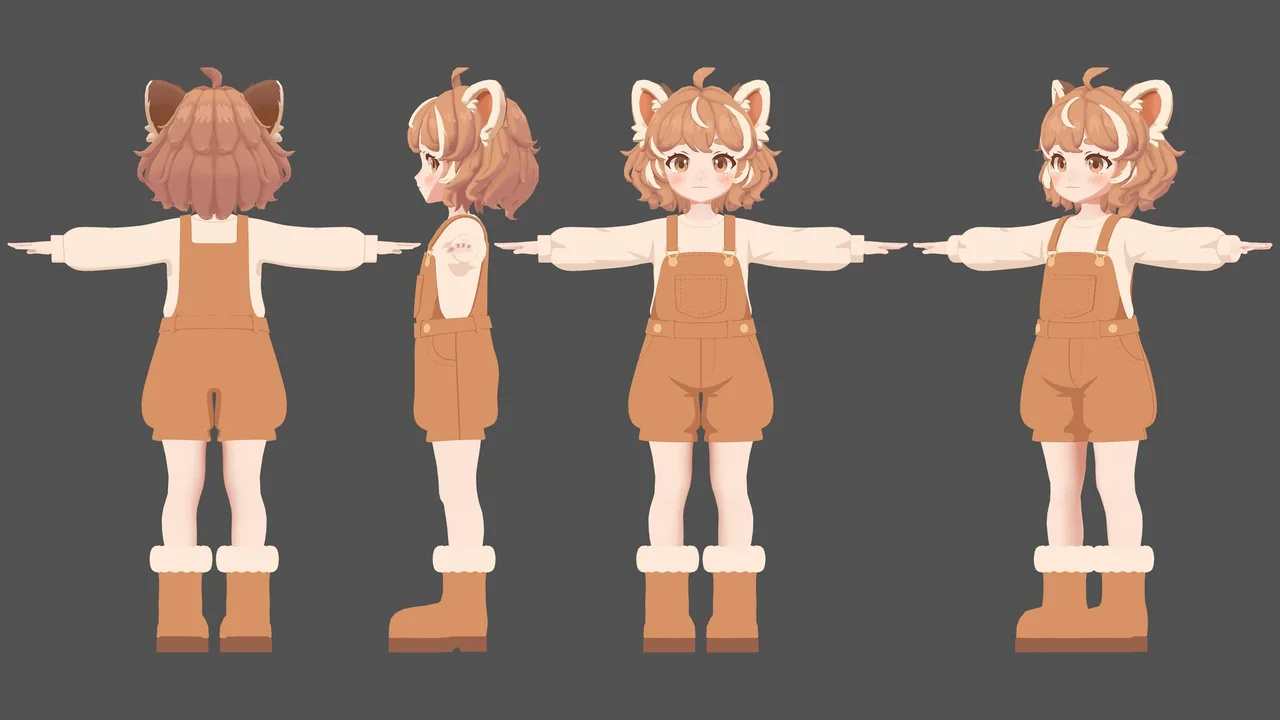
Review textures in the target lighting and shader, inside the engine when you can. A texture that looks right in the painting tool can turn flat or oversaturated under game lighting. Our character texturing page lists the files this stage delivers.
What you review: the look under game lighting, the number of materials against the budget, and the texture resolution for each build.
8. Rigging
Rigging gives the mesh a skeleton and binds every vertex to it with weights, so the body bends where it should. Controls on top of the skeleton make it easier to pose. Extra chains handle hair, clothing, tails and props.
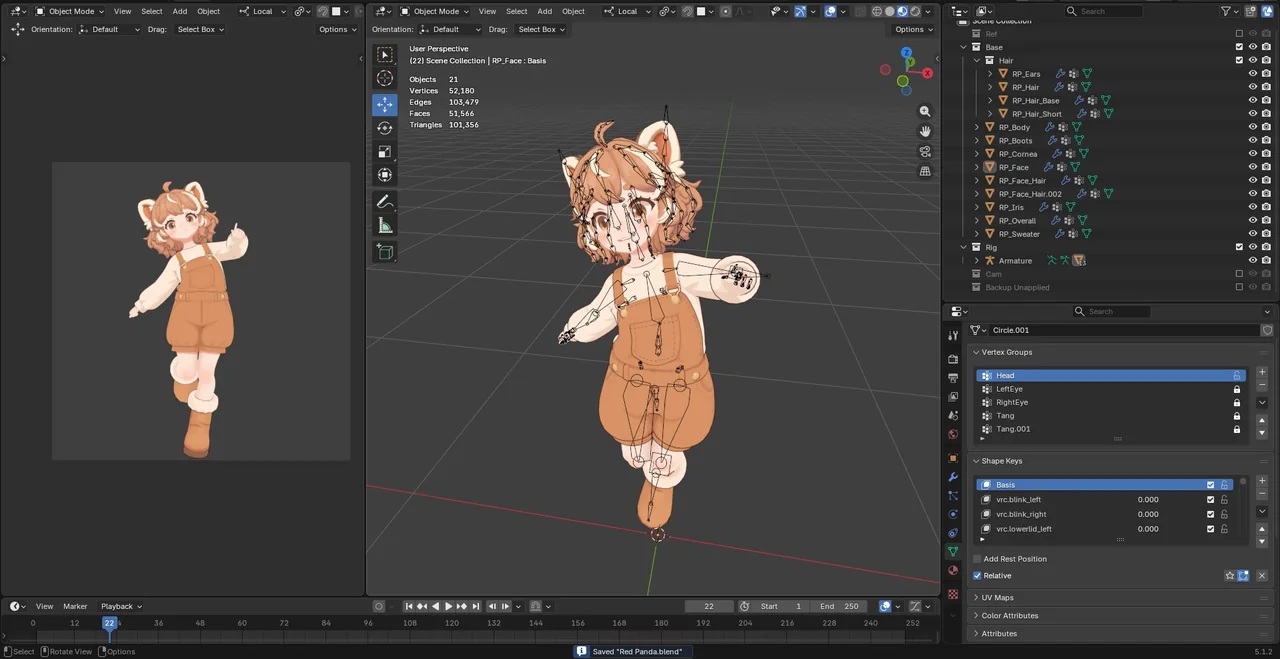
If your game already has a skeleton, the rig should match it: the same hierarchy, bone names and orientation. If you retarget animation through Unity’s Humanoid system, the bones also have to map to the body structure that Unity’s Humanoid Avatar expects.
Review the rig in motion, not in a T-pose. A range-of-motion test moves every joint toward its limit: shoulders raised, elbows folded, wrists twisted, hips and knees bent. Look for volumes that collapse and clothing that cuts through the body.
What you review: deformation at the extremes, skeleton naming against your spec, and how the secondary chains move.
9. Facial system
The face gets its own stage because it carries most of a character’s emotion. Depending on the brief, it is built with facial bones, with blendshapes, or with both. Blendshapes, which Blender calls shape keys, are sculpted versions of the face that the engine blends in by weight.
A full blendshape system usually has three layers: the 52 ARKit shapes for face tracking, visemes for speech, and custom expressions for gameplay or emotes. Our guide to ARKit 52 blendshapes covers the first two in detail.
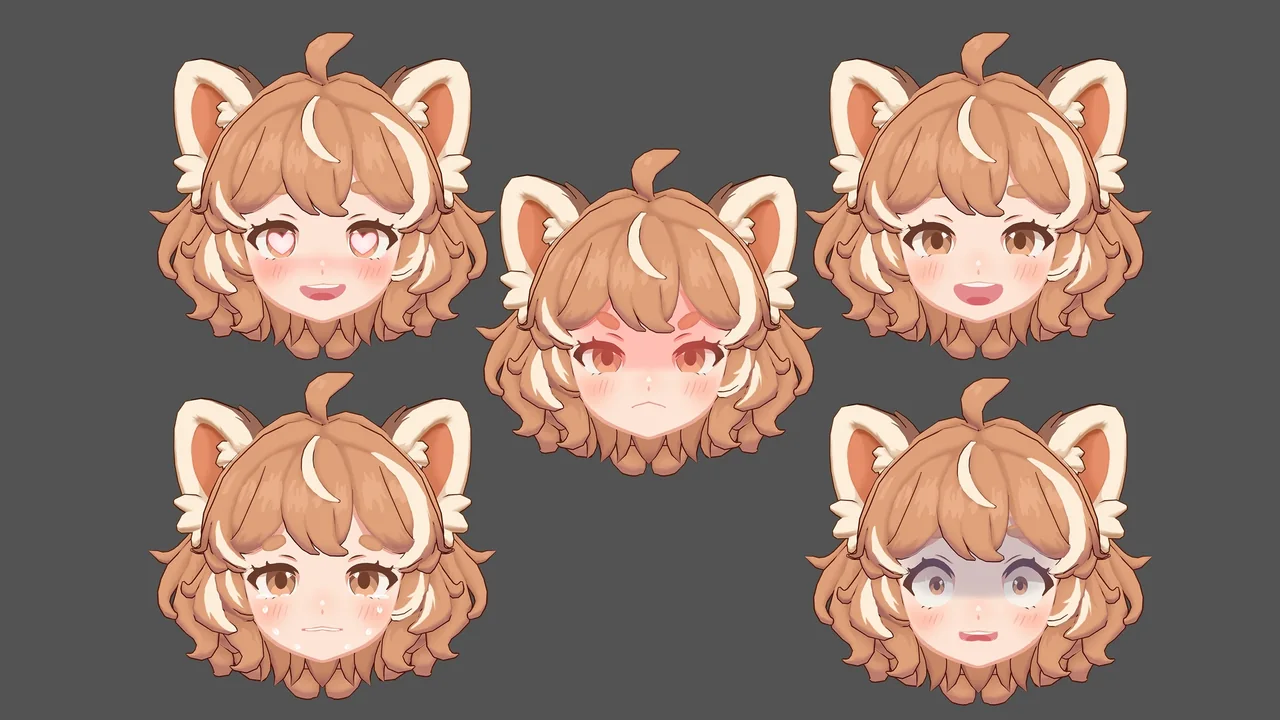
What you review: every shape on its own and in pairs, such as a blink with a smile or an open jaw with a smile, at full weight and halfway.
10. Engine setup
The last stage puts the character into your engine the way your team will use it: imported at the right scale, with materials and shaders assigned, the skeleton configured, the facial shapes wired, and any variants or toggles set up. The result is a package your team can drop into a scene.
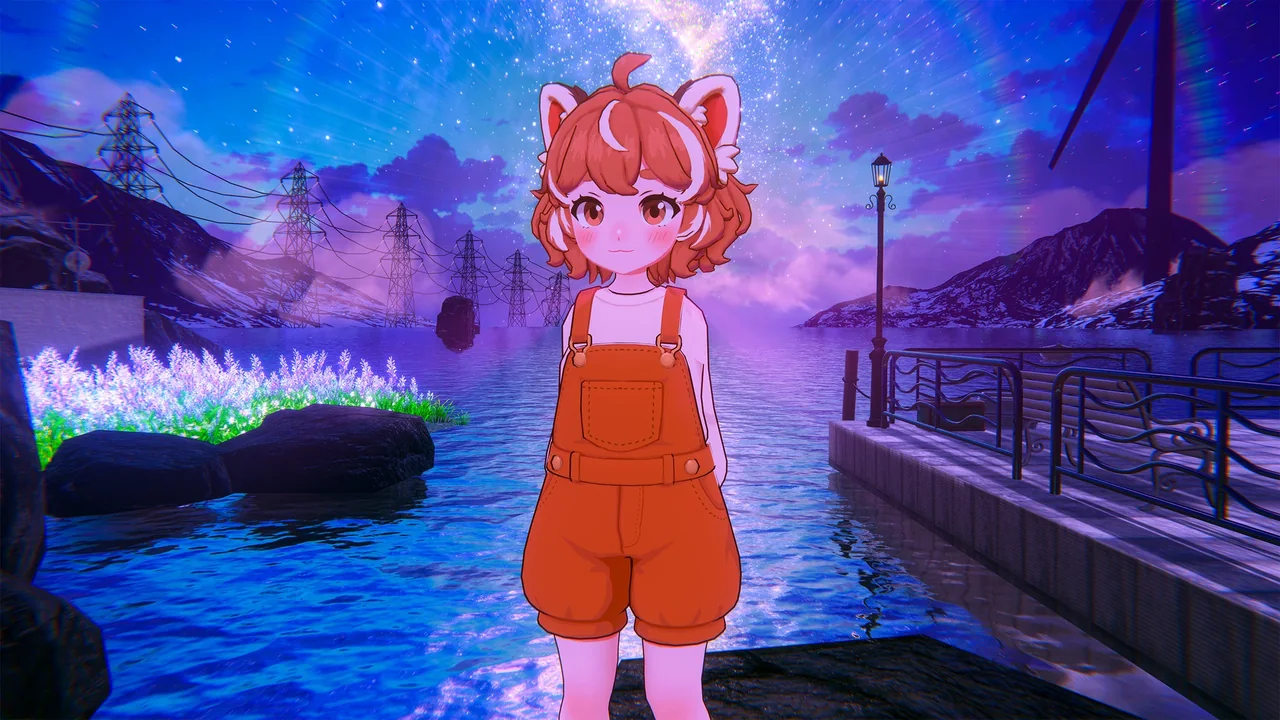
Review it in a real scene, under your game’s lighting, at gameplay distance and in close-up. Read the performance numbers in the engine itself. The triangle and vertex counts there are the ones that matter, because UV seams and hard edges split vertices on import.
NumiNumi was delivered as a Blender file, FBX, a Unity package and PSD textures with UV layouts, in PC and mobile builds.
What you review: the look in your engine, scale, materials, performance counts and the documentation.
Running the reviews
Ten gates sound slow. In practice they make production faster, because each decision closes while it is still cheap. Three habits keep them that way:
- One owner per review. Lemon Sky’s outsourcing guide recommends merging all feedback into one set of notes before it reaches the outside team.
- Review the right thing at each gate. Silhouette at blockout, forms at sculpt, edges at retopology, look at texturing, motion at rigging.
- Approve in writing. An approved stage is the baseline for the next one. Reopening it later costs every stage built on top of it.
Rellward runs all ten stages, or takes on a single stage when your team handles the rest: 3D character modeling, texturing, or rigging and facial systems. Testing a new partner? A pilot character runs one character through the whole pipeline before you commit a roster.
Sources
Sources: Adobe, how to bake mesh maps in Substance 3D Painter, Blender manual, shape keys, Unity manual, Humanoid Avatar, Lemon Sky, game art outsourcing guide.
